NCERT Science Notes - Class 10
Chapter 5 - Life Processes

Welcome to AJs Chalo Seekhen. This webpage is dedicated to Class 10 | Science | Chapter 5 - Life Processes. The chapter delves into the intricacies of life as we unravel the essential processes that define living organisms. From respiration to growth, reproduction to response, and metabolism to organization, our comprehensive notes provide a deep understanding of the mechanisms that sustain life. Explore this enlightening chapter and unlock the secrets of vitality.

Class 10 NCERT metals and non metals notes ajs, cbse notes class 10 ajslearning, cbse notes ajs, ajs notes class 10, ajslearning, ajs chalo seekhen

NOTES

NCERT Science Notes - Class 10
Chapter 5 - Life Processes

    5.0 Introduction

    To differentiate between living and non-living entities, we often look for certain characteristics or evidence of life. Here are some common criteria used to determine if something is alive:

    1. Movement: Visible movement is a clear sign of life in many cases. For example, animals like dogs and cows exhibit noticeable movements, which indicate their vitality. However, as mentioned in your text, some organisms may not show visible movement, and microscopic movements at the molecular level are essential for life.
    2. Growth: The ability to grow and develop over time is another characteristic of living organisms. Plants, for instance, may not always exhibit visible movement, but they do grow, which is a sign of life.
    3. Breathing or Respiration: The process of respiration, where organisms exchange gases (like oxygen and carbon dioxide) with their environment, is a vital sign of life. Breathing may involve visible lung expansion and contraction in animals or cellular respiration in all living cells.
    4. Reproduction: Many living organisms have the ability to reproduce and create offspring, ensuring the continuation of their species. Reproduction is a fundamental characteristic of life.
    5. Response to Stimuli: Living organisms often respond to external stimuli, such as light, temperature changes, or touch. This responsiveness is known as irritability and is a sign of life.
    6. Metabolism: All living organisms have metabolic processes that involve chemical reactions to obtain energy, grow, and maintain their structures. These metabolic processes include digestion, circulation, and other cellular activities.
    7. Organization: Living organisms are highly organized, from cells to tissues to organs, ensuring that their structures function efficiently. Maintaining this organization is crucial for life.
    8. Homeostasis: Living organisms maintain internal stability through processes like temperature regulation and pH balance. This ability to keep a constant internal environment is essential for life.

    Regarding your mention of molecular movements, yes, molecular movement is essential for life, especially at the cellular level. Cells constantly undergo molecular movements to transport nutrients, eliminate waste, and carry out various biochemical processes necessary for survival. 

    Viruses, as you noted, are a unique case because they lack metabolic processes and cannot independently reproduce. Their status as living or non-living entities is a subject of debate among scientists.

    In summary, the characteristics of life involve a combination of visible and microscopic features, and the presence of one or more of these criteria can help determine whether an entity is alive or not.

    5.1 - What are Life Processes?

    Life processes are essential functions that maintain life in living organisms, whether they are actively doing something or at rest. These processes include:

    1. Nutrition: The process of transferring energy from outside the body to the inside. This involves obtaining food, which is typically carbon-based, and converting it into a form that the body can use. Different organisms have different nutritional processes depending on the complexity of their food sources.
    2. Respiration: This is the process of acquiring oxygen from outside the body and using it to break down food sources for cellular needs. It involves a series of chemical reactions, primarily oxidising-reducing reactions, to convert food into a uniform source of energy.
    3. Transportation: In multicellular organisms, not all cells are in direct contact with the environment, so a transportation system is necessary to carry food, oxygen, and waste products to and from different parts of the body.
    4. Excretion: This involves the removal and discarding of waste by-products from the body. In multicellular organisms, specialized tissues typically handle excretion, and the transportation system carries waste away from cells to these excretory tissues.

    In single-celled organisms, these processes are simpler because the entire surface of the organism is in contact with the environment, allowing direct exchange of materials. However, in multicellular organisms, the complexity increases due to the need for specialized tissues and systems to perform these life processes efficiently. These processes are vital for maintaining the structure and function of living organisms, and they require energy to occur.

    5.2 NUTRITION

    Nutrition in Organisms

    1. Energy Requirement: All organisms need energy for activities and maintaining bodily functions. This energy comes from food.
    2. Autotrophs: These organisms, like green plants and some bacteria, make their own food from simple inorganic substances (carbon dioxide and water) through photosynthesis.
    3. Heterotrophs: Animals and fungi belong to this group. They consume complex substances and break them down into simpler forms using enzymes. Their survival depends on autotrophs for food.
    4. Interdependence: Heterotrophs rely on autotrophs for their nutritional needs, highlighting an ecosystem's interconnected nature.

    Autotrophic Nutrition

    Autotrophs are organisms that can produce their own food using light, water, carbon dioxide, or other chemicals. Plants and some bacteria are common examples. The process they use is known as photosynthesis.

    Photosynthesis

    • Process: Photosynthesis is the process by which autotrophs convert carbon dioxide and water into carbohydrates in the presence of sunlight and chlorophyll.
    • Chemical Equation: The basic chemical equation for photosynthesis is:
    • This represents the conversion of carbon dioxide and water into glucose (C6​H12​O6) and oxygen.
    • Energy Storage: The carbohydrates produced are used for energy. Excess carbohydrates are often stored as starch in plants, similar to how humans store excess energy as glycogen.

    Steps in Photosynthesis

    1. Absorption of Light Energy by Chlorophyll: Chlorophyll in the chloroplasts of plant cells absorbs sunlight.

    2. Conversion of Light Energy to Chemical Energy: The absorbed light energy is used to split water molecules into hydrogen and oxygen.

    3. Reduction of Carbon Dioxide to Carbohydrates: The energy from step 2 is used to convert carbon dioxide into carbohydrates like glucose.

    Timing of Photosynthesis Steps

    • In some plants, like desert plants, these steps can occur at different times. For example, they might take up CO2 at night and process it during the day when sunlight is available.

    Chlorophyll and Chloroplasts

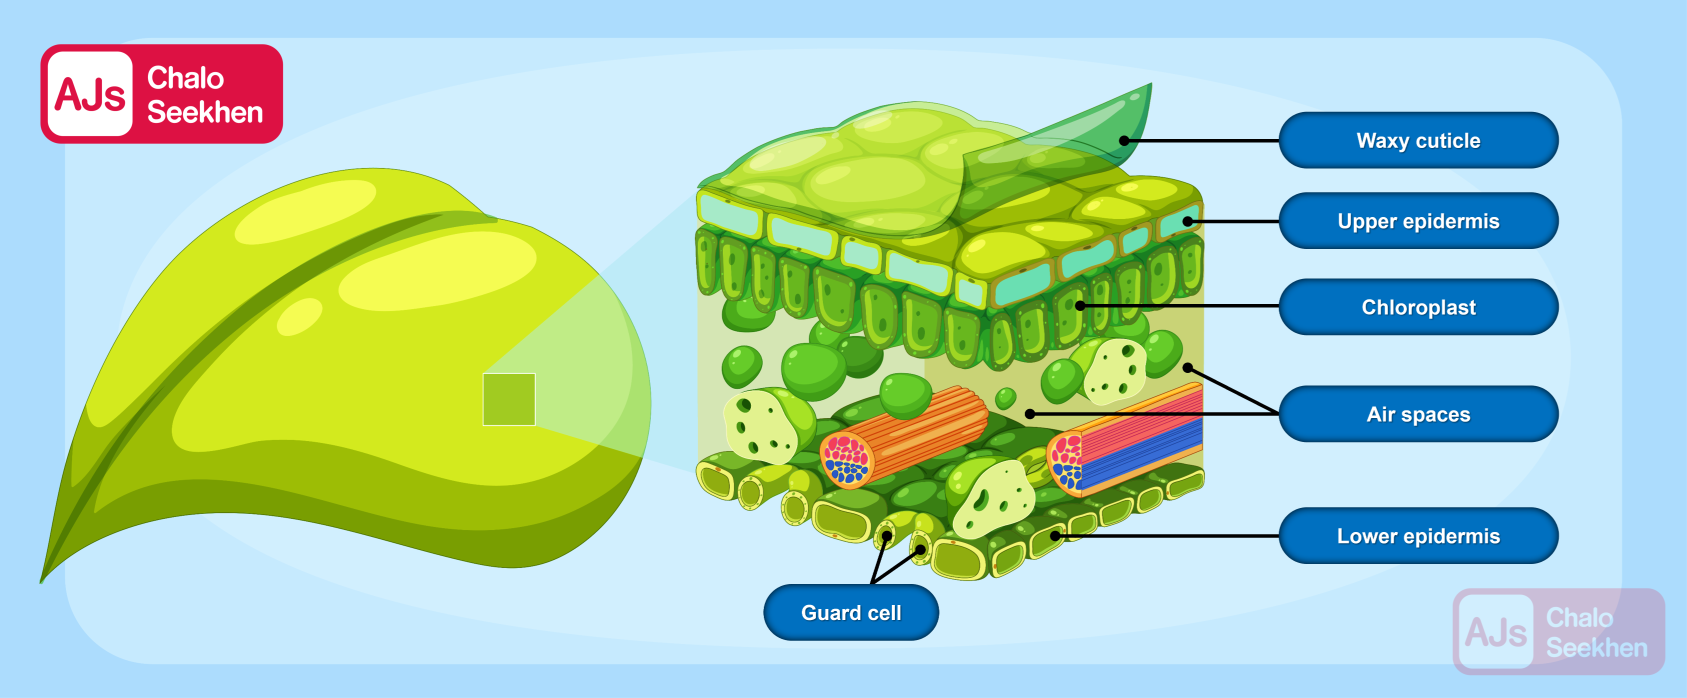
    • Chloroplasts are the cell organelles in plants where photosynthesis occurs. They contain chlorophyll, which is crucial for the process. Experiments can demonstrate that chlorophyll is essential for photosynthesis.

    Overview

    This detailed explanation of autotrophic nutrition, specifically through the process of photosynthesis, highlights the importance of autotrophs in the ecosystem. They not only provide their own energy but also serve as the primary producers in the food chain, supporting heterotrophs (like animals and fungi) that cannot produce their own food.

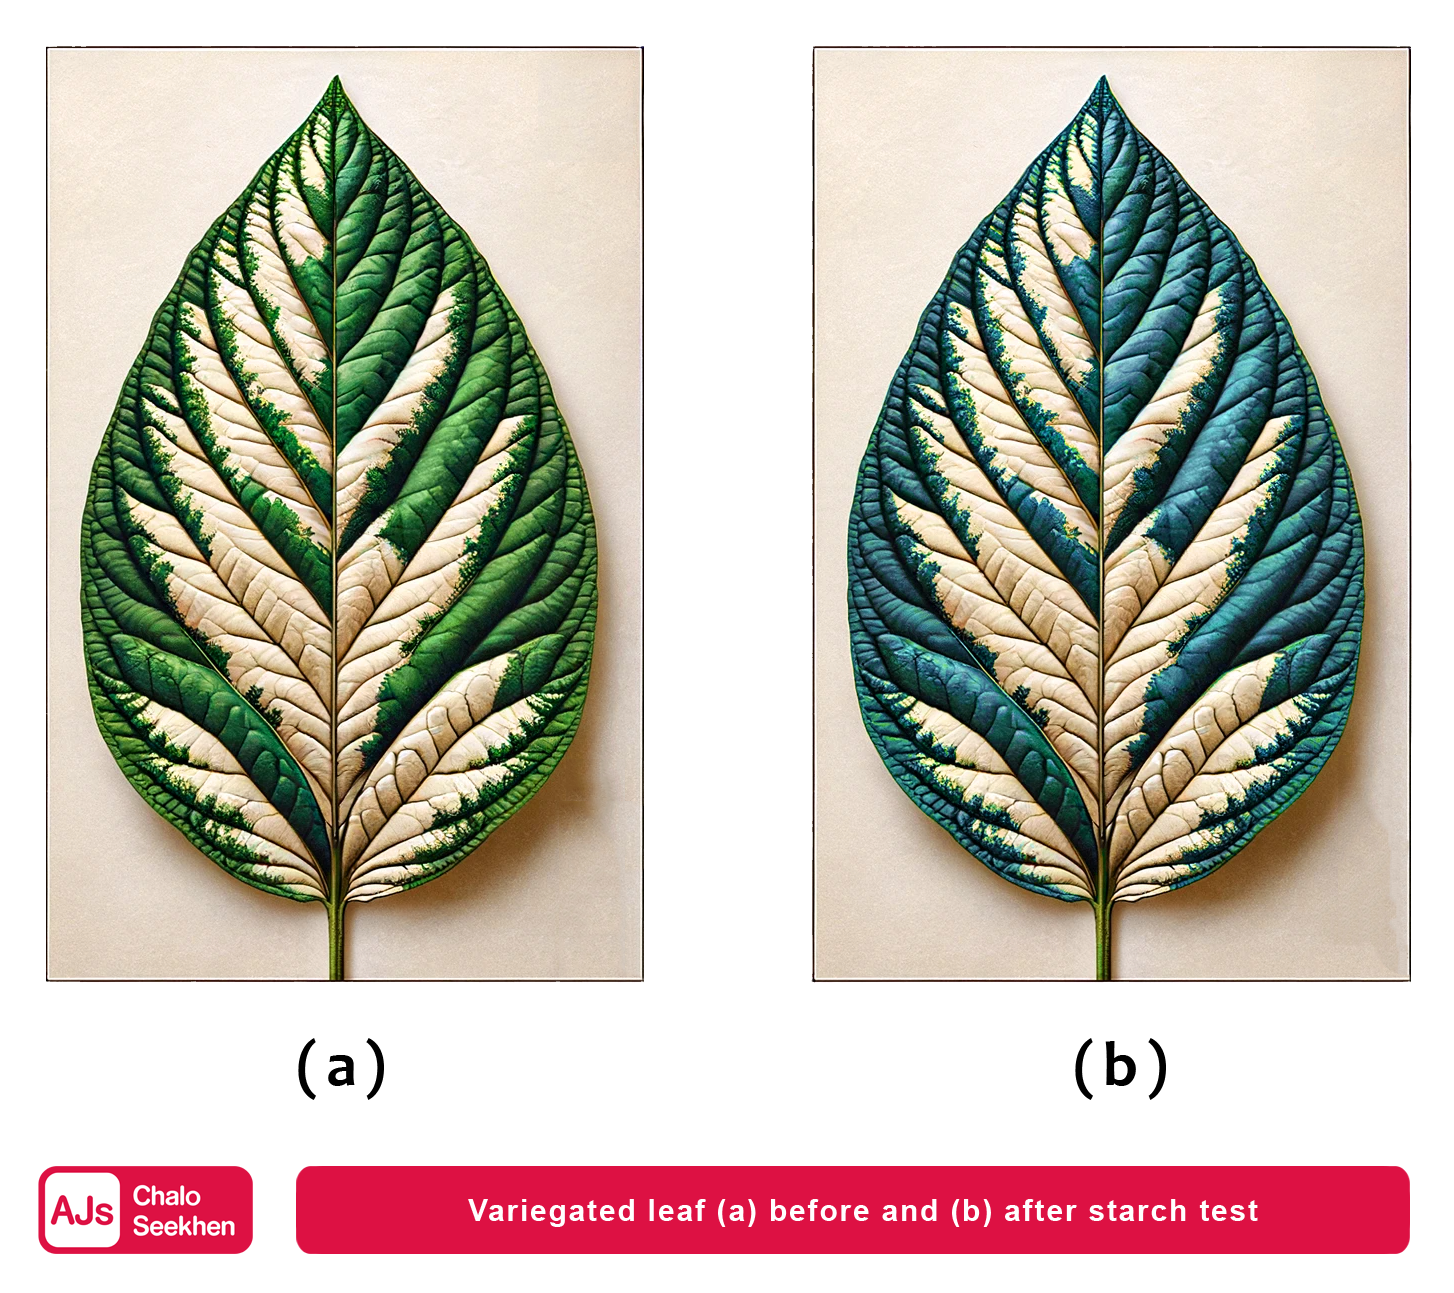
    Activity 5.1 : Summary

    1. Objective: To demonstrate starch production in leaves through photosynthesis.
    2. Procedure:
      • Use a variegated leaf plant (e.g., money plant, croton).
      • First, store the plant in darkness for three days to deplete starch.
      • Then, expose it to sunlight for about six hours.
      • Pluck a leaf, trace its green areas on paper, and note the color changes through the following steps:
        1.  Boil the leaf to kill it.
        2.  Immerse it in alcohol and heat in a water bath to remove chlorophyll.
        3.  Observe the color change in the leaf and the alcohol.
        4.  Soak the leaf in iodine solution, then rinse.
        5.  Compare the final leaf color to the initial tracing.
    3. Observation and Conclusion:
      • The experiment shows where starch is stored in the leaf, indicated by color changes due to the iodine test. This helps understand photosynthesis areas.

    4. Carbon Dioxide Uptake and Stomata Function

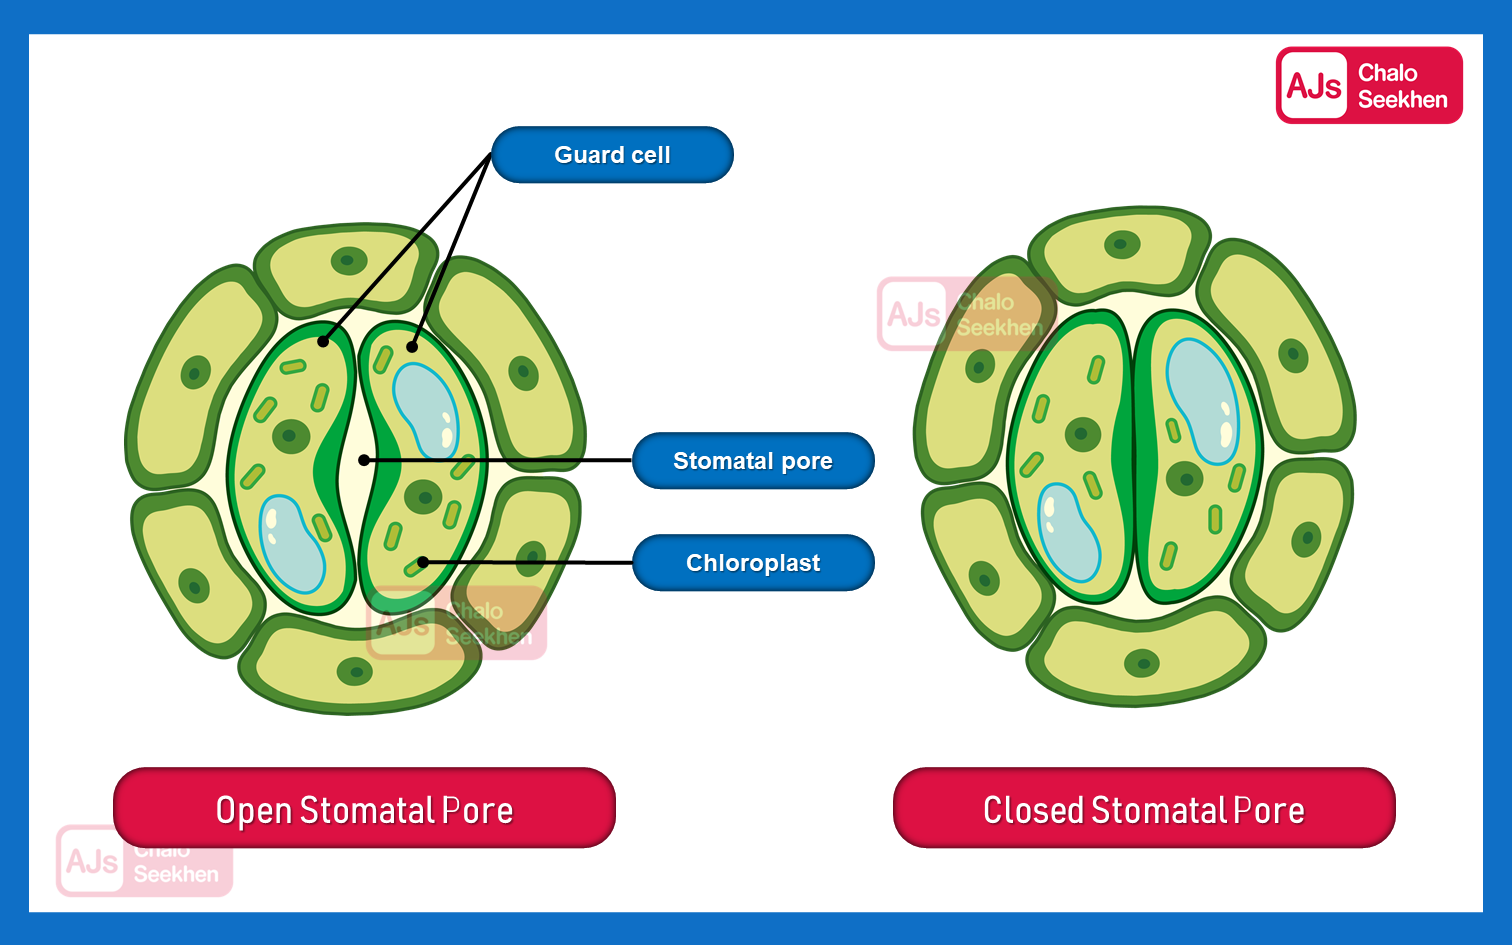
      • Stomata: Plants have tiny pores on their leaf surfaces called stomata, which are crucial for gas exchange, including the uptake of carbon dioxide necessary for photosynthesis.
      • Gaseous Exchange: While stomata are mainly found on leaves, gas exchange also occurs across the surfaces of stems and roots to a lesser extent.
      • Water Loss: Stomata also play a role in transpiration, which is the loss of water vapor from the plant. This can be significant, so plants have adapted to regulate it.
      • Guard Cells: The opening and closing of stomata are controlled by guard cells, which surround each stomatal pore. When guard cells take in water, they swell and open the pore, allowing gas exchange. When they lose water and shrink, the pore closes, reducing water loss and carbon dioxide exchange.

      This system allows the plant to balance its need for carbon dioxide for photosynthesis with the need to minimize water loss, especially in conditions where water is scarce or during times when photosynthesis is not occurring, such as at night.

    Activity 5.2 : Summary


      1. Objective: To show that carbon dioxide is needed for photosynthesis.
      2. Method:
        • Select two similar-sized healthy potted plants.
        • Store them in darkness for three days to deplete stored starch.
        • Place them on separate glass plates with a watch-glass containing potassium hydroxide next to one plant to absorb CO2.
        • Cover each plant with bell-jars sealed with vaseline to ensure an air-tight environment.
        • Expose to sunlight for about two hours.
        • Test a leaf from each plant for starch presence.
      3. Observations:
        • The leaf from the plant with potassium hydroxide (which absorbs CO2) should show less or no starch presence compared to the other plant.
      4. Conclusions:
        • Carbon dioxide is necessary for photosynthesis, as the plant without CO2 will not perform photosynthesis efficiently and thus, not produce starch.


      Designing an Experiment for Sunlight's Role in Photosynthesis

      Based on the above activities, an experiment to demonstrate the role of sunlight could be as follows:
      1. Take two similar-sized healthy potted plants and keep them in a dark room for three days.
      2. Cover one plant with a material that allows air but no light (a black bag or box) and leave the other exposed to sunlight.
      3. After a few hours, test leaves from both plants for starch.
      4. The plant exposed to sunlight should show starch presence, while the one kept in the dark should not, demonstrating that sunlight is essential for photosynthesis.


      Nutrient Uptake in Autotrophs

      Beyond energy requirements, autotrophs also absorb water and minerals from the soil for growth and maintenance:
      • Water: Absorbed through the roots and used in photosynthesis.
      • Minerals: Such as nitrogen, phosphorus, iron, and magnesium, are essential for synthesizing proteins and other compounds. Nitrogen is absorbed as inorganic nitrates or nitrites, or as organic compounds synthesized by bacteria from atmospheric nitrogen.

      3.2.3 What happens when Metals react with Acids?

      Activity 3.11

      1. Objective:
        • To investigate how different metals react with dilute acids.
      2. Safety and Preparation:
        • Exclude sodium and potassium due to their vigorous reactions with water.
        • Clean tarnished metal samples with sandpaper.
      3. Procedure:
        • Place the clean metal samples in separate test tubes containing dilute hydrochloric acid.
        • Insert thermometers into the test tubes to measure temperature changes.
        • Observe the rate of bubble formation (indicating hydrogen gas production).
      4. Observations:
        • Identify which metals react vigorously with the acid.
        • Record the temperature to determine the most exothermic reaction.
        • Arrange the metals in order of decreasing reactivity with dilute hydrochloric acid.
      5. Chemical Reactions with Hydrochloric Acid:
        • Write balanced chemical equations for reactions of magnesium, aluminium, zinc, and iron with dilute hydrochloric acid, reflecting the production of respective salts and hydrogen gas.
      6. Exception with Nitric Acid:
        • Normally, hydrogen gas is not produced when metals react with nitric acid due to its oxidizing nature.
        • However, magnesium and manganese can produce hydrogen gas when reacting with very dilute nitric acid.
      7. Observational Conclusions:
        • The fastest bubble formation and most exothermic reaction occur with magnesium.
        • The reactivity order observed is Mg > Al > Zn > Fe.
        • Copper does not react with dilute hydrochloric acid, as indicated by the absence of bubbles and no change in temperature.

      Do You Know !

      Interesting Fact (Aqua Regia):

      • Aqua regia is a potent mixture of hydrochloric acid and nitric acid in a 3:1 ratio.
      • It can dissolve gold and platinum, despite these metals being resistant to individual acids.
      • Aqua regia is highly corrosive and fuming.

      3.2.4 - How do Metals react with Solutions of other Metal Salts?

      Activity 3.12

      1. Objective:
        • To investigate how metals react with solutions of salts of other metals.
      2. Experiment Setup:
        • Use a clean copper wire and an iron nail.
        • Place the copper wire in a solution of iron sulphate and the iron nail in a solution of copper sulphate in separate test tubes.
      3. Procedure:
        • Observe the reactions over 20 minutes.
      4. Observations and Inferences:
        • Identify the test tube where a reaction has occurred.
        • Determine the evidence of reaction, typically by observing color changes or metal deposition.
        • Compare observations to previous activities to understand reactivity trends.
      5. Chemical Equations and Reaction Types:
        • Write balanced chemical equations for the observed reactions.
        • Determine the type of reaction, likely to be a single displacement (or substitution) reaction.
      6. Conceptual Understanding:
        • Displacement reactions allow us to compare the reactivity of different metals.
        • The reactivity series can be established by observing which metals can displace others from their compounds.
        • The general equation for displacement reactions is: Metal A + Salt solution of B Salt solution of A + Metal B
      7. Conclusions from Activity 3.12:
        • The metal that displaces another from its salt solution is more reactive.
        • Based on the activity, students will conclude whether copper or iron is more reactive.

      Through Activity 3.12, students can witness firsthand the displacement reactions between metals and metal salt solutions. This activity helps in understanding the concept of reactivity series, which ranks metals based on their ability to displace others from their compounds. The reactivity series is an important concept in chemistry that explains the outcomes of various reactions, including those with oxygen, water, and acids, as explored in previous activities (3.9, 3.10, and 3.11).

      3.2.5 - The Reactivity Series

      The reactivity series is a list of metals arranged in the order of their decreasing activities. After performing displacement experiments (Activities 1.9 and 3.12), the following series, known as the reactivity or activity series, has been developed. 

       Table 3.2 Activity Series: Relative Reactivities of Metals

      • Potassium (K) is listed as the most reactive metal.
      • The reactivity decreases in the following order: Potassium (K), Sodium (Na), Calcium (Ca), Magnesium (Mg), Aluminium (Al), Zinc (Zn), Iron (Fe), Lead (Pb), [Hydrogen (H)], Copper (Cu), Mercury (Hg), Silver (Ag), and Gold (Au) as the least reactive.
      • The position of hydrogen (H) in the series is significant as it allows us to predict whether a metal can displace hydrogen from an acid.
      • Metals above hydrogen in the series can displace hydrogen from dilute acids, whereas those below cannot.
      • The reactivity series is useful for predicting the outcomes of reactions involving metals and their compounds.

      This series is fundamental in understanding the behavior of metals in various chemical reactions, including their interactions with water, acids, and other metal salts.

      3.3 How Do Metals and Non-Metals React?

      • The reactivity of elements is due to their tendency to achieve a completely filled valence shell.
      • Noble gases have a full valence shell, which is why they exhibit minimal chemical activity.
      • Metals and non-metals react to attain stable electronic configurations similar to noble gases.

      Electronic Configurations:

      • A sodium atom has one electron in its outermost shell (M shell). By losing this electron, its next shell (L shell) becomes the outermost, achieving a stable octet configuration.
      • After losing an electron, the sodium atom becomes a cation (Na+) with a net positive charge due to having more protons (11) than electrons (10).
      • Chlorine, with seven electrons in its outermost shell, requires one more electron to complete its octet.

      Formation of Sodium Chloride (NaCl):

      • Sodium can donate its outer electron to chlorine, which needs an extra electron.
      • The chlorine atom gains an electron and becomes a chloride anion (Cl) with a net negative charge.
      • Sodium ions (Na+) and chloride ions (Cl), being oppositely charged, attract each other and form sodium chloride.
      • Sodium chloride exists as an aggregate of ions rather than discrete molecules.

      Formation of Magnesium Chloride (MgCl2):

      • Magnesium (Mg) loses two electrons to form a magnesium cation (Mg2+).
      • Each chlorine atom gains one electron to form chloride anions (Cl).
      • The compound formed is magnesium chloride (MgCl2), an ionic compound where the magnesium ion is the cation and the chloride ions are the anions.

      Ionic Compounds:

      • Ionic or electrovalent compounds are formed by the transfer of electrons from metals to non-metals.
      • These compounds consist of cations (positive ions) and anions (negative ions) held together by electrostatic forces.

      Electronic Configurations of Some Elements (Table 3.3):

      • Lists the electronic configurations of noble gases (Helium, Neon, Argon) and various metals (Sodium, Magnesium, Aluminium) and non-metals (Nitrogen, Oxygen, Fluorine, Phosphorus, Sulfur, Chlorine).
      • The electronic configurations are noted in terms of the number of electrons in the K, L, M, and N shells.

      Electronic Configurations of some Elements

      Type of Element Element Atomic Number Number of Electrons in Shells
      K L M N
      Noble Gases
      Helium (He) 2 2
      Neon (Ne) 10 2 8
      Argon (Ar) 18 2 8 8
      Metals
      Sodium (Na) 11 2 8 1
      Magnesium (Mg) 12 2 8 2
      Aluminium (Al) 13 2 8 3
      Potassium (K) 19 2 8 8 1
      Calcium (Ca) 20 2 8 8 2
      Non-metals
      Nitrogen (N) 7 2 5
      Oxygen (O) 8 2 6
      Fluorine (F) 9 2 7
      Phosphorus (P) 15 2 8 5
      Sulphur (S) 16 2 8 6
      Chlorine (Cl) 17 2 8 7

      3.3.1 - Properties of Ionic Compounds

      To learn about the properties of ionic compounds, let us perform the following Activity:

      Activity 3.13

      • Take samples of sodium chloride, potassium iodide, barium chloride or any other salt from the science laboratory. What is the physical state of these salts?
      • Take a small amount of a sample on a metal spatula and heat directly on the flame (Fig. 3.7). Repeat with other samples.
      • What did you observe? Did the samples impart any colour to the flame? Do these compounds melt?
      • Try to dissolve the samples in water, petrol and kerosene. Are they soluble?
      • Make a circuit as shown in Fig. 3.8 and insert the electrodes into a solution of one salt. What did you observe? Test the other salt samples too in this manner.
      • What is your inference about the nature of these compounds?

      Table 3.4

      Melting and boiling points of  some ionic compounds

      Ionic compound Melting point (K) Boiling point (K)
      NaCl 1074 1686
      LiCl 887 1600
      CaCl2 1045 1900
      CaO 2850 3120
      MgCl2 981 1685

      You may have observed the following general properties for ionic compounds —

      1. Physical nature: Ionic compounds are solids and are somewhat hard because of the strong force of attraction between the positive and negative ions. These compounds are generally brittle and break into pieces when pressure is applied.
      2. Melting and Boiling points: Ionic compounds have high melting and boiling points (see Table 3.4). This is because a considerable amount of energy is required to break the strong inter-ionic attraction.
      3. Solubility: Electrovalent compounds are generally soluble in water and insoluble in solvents such as kerosene, petrol, etc.
      4. Conduction of Electricity: The conduction of electricity through a solution involves the movement of charged particles. A solution of an ionic compound in water contains ions, which move to the opposite electrodes when electricity is passed through the solution. Ionic compounds in the solid state do not conduct electricity because movement of ions in the solid is not possible due to their rigid structure. But ionic compounds conduct electricity in the molten state. This is possible in the molten state since the electrostatic forces of attraction between the oppositely charged ions are overcome due to the heat. Thus, the ions move freely and conduct electricity.

      3.4.1 - Extraction of Metals

        • The reactivity series of metals helps in understanding the extraction process.
        • Metals found in the free state are typically at the bottom of the reactivity series (e.g., gold, silver, platinum, copper).
        • Highly reactive metals (e.g., potassium, sodium, calcium, magnesium, and aluminum) are never found free in nature.
        • Metals of medium reactivity (e.g., zinc, iron, lead) are commonly found as oxides, sulphides, or carbonates.
        • Oxygen's abundance and reactivity mean that many metal ores are oxides.

        Categories of Metals Based on Reactivity:
        1. Metals of Low Reactivity: These metals like gold (Au) and silver (Ag) are often found in their native state.
        2. Metals of Medium Reactivity: Metals like zinc (Zn), iron (Fe), and lead (Pb) are found as oxides, sulphides, or carbonates and are usually reduced using carbon.
        3. Metals of High Reactivity: Metals such as potassium (K), sodium (Na), calcium (Ca), magnesium (Mg), and aluminum (Al) are extracted by electrolysis of their molten ores.

        Steps Involved in the Extraction of Metals:
        • Concentration of Ore: The first step in the extraction process is the removal of impurities to increase the metal content.
        • Reduction to Metal:
          • For metals of high reactivity, electrolysis of molten ore is used to obtain the pure metal.
          • For metals of medium reactivity, reduction of metal oxide is achieved through processes such as calcination (for carbonate ores) and roasting (for sulphide ores).
          • For metals of low reactivity, reduction may not be necessary as they are often found in their native state. If found as compounds, roasting is used followed by refining.
        • Purification of Metal: The final step is the purification of the metal to obtain its pure form.
        In summary, the method of extraction and processing depends on the metal's reactivity and the form in which it is found in the ore. This systematic approach from concentration to purification enables the efficient production of metals for various uses.

      Extracting Metals from Ores

      3.4.2 - Enrichment of Ores

      1. Ore and Gangue: Ores are sources of metals, contaminated with impurities known as gangue, like soil and sand.
      2. Need for Removal of Gangue: These impurities must be removed before metal extraction for efficiency.
      3. Separation Techniques: This is done by exploiting differences in physical or chemical properties between the ore and gangue using various techniques.


      3.4.3 - Extracting Metals Low in the Activity Series

      1. Low Reactivity Metals: Metals at the bottom of the activity series are less reactive and easily reduced.
      2. Example - Mercury (Cinnabar - HgS): The process involves heating cinnabar to form mercuric oxide, then mercury.
        • 2HgS(s) + 3O2(g) → 2HgO(s) + 2SO2(g)
        • 2HgO(s) → 2Hg(l) + O2(g)
      3. Example - Copper (Cu2S): Copper is extracted by heating its sulfide ore in air.
        • 2Cu2S + 3O2(g) → 2Cu2O(s) + 2SO2(g)
        • 2Cu2O + Cu2S → 6Cu(s) + SO2(g)


      3.4.4 - Extracting Metals in the Middle of the Activity Series

      1. Moderately Reactive Metals: Metals like iron, zinc, lead, found as sulfides or carbonates.
      2. Conversion to Oxides:
        • Roasting: Sulfide ores are converted into oxides by heating in excess air.
          • Example Reaction (Roasting of Zinc Ore): 2ZnS(s) + 3O2(g) → 2ZnO(s) + 2SO2(g)
        • Calcination: Carbonate ores are converted into oxides by heating in limited air.
          • Example Reaction (Calcination of Zinc Carbonate): ZnCO3(s) → ZnO(s) + CO2(g)
      3. Reduction to Metals: Metal oxides are reduced to metals, like zinc oxide to zinc metal.
        • Example Reaction (Reduction of Zinc Oxide): ZnO(s) + C(s) → Zn(s) + CO(g)
      4. Oxidation and Reduction: The process of obtaining metals from their compounds is a reduction process.
      5. Displacement Reactions: Highly reactive metals can displace less reactive metals from their compounds.
        • Example Reaction (Using Aluminium): 3MnO2(s) + 4Al(s) → 3Mn(l) + 2Al2O3(s) + Heat
        • Example of Thermit Reaction: Fe2O3(s) + 2Al(s) → 2Fe(l) + Al2O3(s) + Heat


      Notes for Understanding:

      • Roasting and Calcination: These are preparatory processes that convert sulphides and carbonates into oxides, which are easier to reduce to metals.
      • Reduction Process: The metal oxides obtained are then reduced to pure metals. This reduction is often done using carbon.
      • Displacement Reactions: Highly reactive metals like aluminium can displace less reactive metals from their compounds. These reactions are typically very exothermic, producing metals in a molten state.
      • Thermit Reaction: This is a specific type of displacement reaction used in practical applications like welding railway tracks, where iron oxide is reduced by aluminium.

      3.4.5 Extracting Metals towards the Top of the Activity Series

      Extracting and Refining Metals

      Note: This section discusses the extraction of highly reactive metals, which cannot be reduced using carbon due to their high affinity for oxygen.


      Electrolytic Reduction

      Metals like sodium, magnesium, and calcium are obtained through the electrolysis of their molten chlorides. During this process:

      • The metals are deposited at the cathode (negatively charged electrode).
      • Chlorine is liberated at the anode (positively charged electrode).

      Example Reactions:

      At cathode: Na+ + e → Na

      At anode: 2Cl → Cl2 + 2e


      Aluminium Extraction

      Aluminium is obtained by the electrolytic reduction of aluminium oxide.

      3.4.6 Refining of Metals

      Note: Metals obtained through various reduction processes contain impurities and require refining to achieve purity.

      Electrolytic Refining

      This is a widely used method for refining metals like copper, zinc, tin, nickel, silver, and gold. The process involves:

      • The impure metal as the anode and a thin strip of pure metal as the cathode.
      • Using a solution of the metal salt as an electrolyte.

      During electrolysis:

      • Pure metal from the anode dissolves into the electrolyte.
      • An equivalent amount of pure metal is deposited on the cathode.
      • Soluble impurities dissolve in the solution, while insoluble impurities settle as anode mud.

      Notes for Understanding:

      • Highly Reactive Metals: Metals at the top of the activity series are too reactive to be reduced by carbon. They require a different method, typically electrolytic reduction.
      • Electrolytic Reduction: This involves using an electric current to decompose the compound of the metal. For metals like sodium, magnesium, and calcium, this is done by electrolyzing their molten chlorides.
      • Extraction of Aluminium: Aluminium is extracted by the electrolysis of aluminium oxide, a process different from other metals due to its unique properties.
      • Refining Process: The metals obtained from these processes often contain impurities. Electrolytic refining is a common method to purify these metals. This involves using the impure metal as the anode and a pure metal strip as the cathode, with a suitable electrolyte.

      3.5 CORROSION

      Corrosion

      Overview from Chapter 1: Corrosion is a natural process where metals deteriorate due to reactions with substances in the environment.

      • Silver Corrosion: Silver articles become black due to the formation of silver sulphide from the reaction with sulphur in the air.
      • Copper Corrosion: Copper loses its shiny brown surface and forms a green coat of basic copper carbonate when reacting with moist carbon dioxide.
      • Iron Rusting: Iron develops a coating of rust, a brown flaky substance, when exposed to moist air over time.

      Activity 3.14 : Understanding Iron Rusting

      Experiment to determine the conditions for iron rusting:

      1. Setup: Place clean iron nails in three separate test tubes labeled A, B, and C.
      2. Test Tube A: Add water and cork it. This exposes the nails to both air and water.
      3. Test Tube B: Add boiled distilled water, 1 mL of oil, and cork it. The oil layer prevents air from dissolving in the water, exposing the nails only to water.
      4. Test Tube C: Add anhydrous calcium chloride and cork it. The calcium chloride absorbs moisture, exposing the nails to dry air.

      After a few days, observe the changes:

      • Observation: Rust forms in Test Tube A, but not in B and C.
      • Conclusion: This indicates that both air and water are necessary for iron to rust.

      Notes for Understanding:

      • Corrosion of Different Metals: Each metal corrodes differently due to its unique chemical properties. Silver tarnishes, copper forms a green patina, and iron rusts.
      • Activity 3.14 - Experiment on Iron Rusting:
        • Purpose: To find out the conditions under which iron rusts.
        • Method: Iron nails are placed in three different conditions involving air, water, and oil or desiccants.
        • Results: Rusting occurs only in the presence of both air and water, as seen in Test Tube A. Test Tubes B and C, which lack either air or water, do not show rusting.
        • Conclusion: The experiment demonstrates that both oxygen (from air) and water are necessary for the rusting of iron.

      3.5.1 - Prevention of Corrosion

      Corrosion, especially rusting of iron, can be prevented by several methods. Understanding these can help in prolonging the life of metal objects.

      Common Methods to Prevent Corrosion

      • Painting, Oiling, and Greasing: These methods provide a protective layer that prevents exposure to air and moisture.
      • Galvanisation: Involves coating iron or steel with a layer of zinc. This protects the metal even if the zinc layer is broken, due to the electrochemical protection offered by zinc.
      • Chrome Plating and Anodising: These are other forms of coating that provide a barrier against corrosion.
      • Alloying: Mixing iron with other metals or non-metals changes its properties, making it stronger and more resistant to corrosion. Examples include stainless steel (iron with nickel and chromium) and carbon steel (iron with a small amount of carbon).


      Interesting Facts

      • Gold Alloys: Pure gold (24 carat) is too soft for practical use, so it is alloyed with silver or copper to make it harder. In India, 22 carat gold is commonly used for ornaments.
      • Amalgams: Alloys with mercury are known as amalgams.
      • Electrical Conductivity and Melting Point: Alloys generally have lower electrical conductivity and melting points compared to pure metals. Examples:
        • Brass (copper and zinc) and Bronze (copper and tin) are less conductive than pure copper.
        • Solder (lead and tin) has a low melting point, useful for welding electrical wires.


      The Iron Pillar near Qutub Minar in Delhi: A testament to ancient Indian metallurgy, this iron pillar is over 1600 years old and is renowned for its rust resistance. Weighing 6 tonnes and standing 8 meters tall, it showcases the advanced ironworking skills of ancient Indian craftsmen.

      CBSE Class 10 Science Chapter 3 - Metals and Non-metals Notes


      AJs Chalo Seekhen Class 10 NCERT Notes Chapter 3 - Metals and Non-metals AJs Chalo Seekhen Class 10 CBSE Notes Chapter 3 - Metals and Non-metals ajs Notes Chapter 3 - Metals and Non-metals   ajs class 10 Notes Chapter 3 - Metals and Non-metals

      OUR SERVICES

      Doubt Solving 1-on-1

      Dedicated team provides prompt assistance and individual guidance.

      NCERT Visualized

      Engaging visuals enhance understanding of complex concepts.

      Career Counselling

      Engaging visuals enhance understanding of complex concepts.

      Section-wise Tests

      Assess understanding and track progress through topic-specific tests

      Contact Us

      Course Feedback

      Launch your GraphyLaunch your Graphy
      100K+ creators trust Graphy to teach online
      𝕏
      AJs Chalo Seekhen 2024 Privacy policy Terms of use Contact us Refund policy